

Lip skin is about three to five cell layers thick and carries no oil glands of its own, so it dries out faster than any other part of your face and shows it within hours. A sugar exfoliating scrub for lips is the cheapest fix for the visible half of that problem, and it takes ninety seconds to make.
What a sugar exfoliating scrub for lips actually removes
A sugar exfoliating scrub for lips lifts loose corneocytes that have already died and detached — the flakes that catch on lipstick and peel off in strips. It does not touch the reason they are appearing. If your lips flake because you lick them, breathe through your mouth at night, or take isotretinoin, scrubbing removes the evidence and the flakes come back on the same schedule.
That matters because lip skin cannot take face-level abrasion. The vermillion has a thinner stratum corneum than cheek skin and no sebaceous film to buffer friction, which is why an exfoliating lip scrub has to be softer and shorter than anything you would use on your nose. If you want to understand why the barrier layer matters this much, the research on how the skin barrier holds water in explains the mechanism in detail.
Read your lips before you touch them. Lip scrub dead skin that is ready to go looks matte, pale and slightly lifted at the edges, and it comes away with almost no pressure. Skin that is shiny, tight, split at the corners, or bleeding anywhere is a barrier injury — scrubbing that turns a two-day annoyance into a two-week one. In that state you want occlusion instead, and a dermatologist-approved chapstick for dry lips does more in one night than any scrub.
Set your expectations at two to three days of noticeably smoother texture per scrub. That is the honest ceiling.

The 2:1:1 formula behind every homemade lip scrub
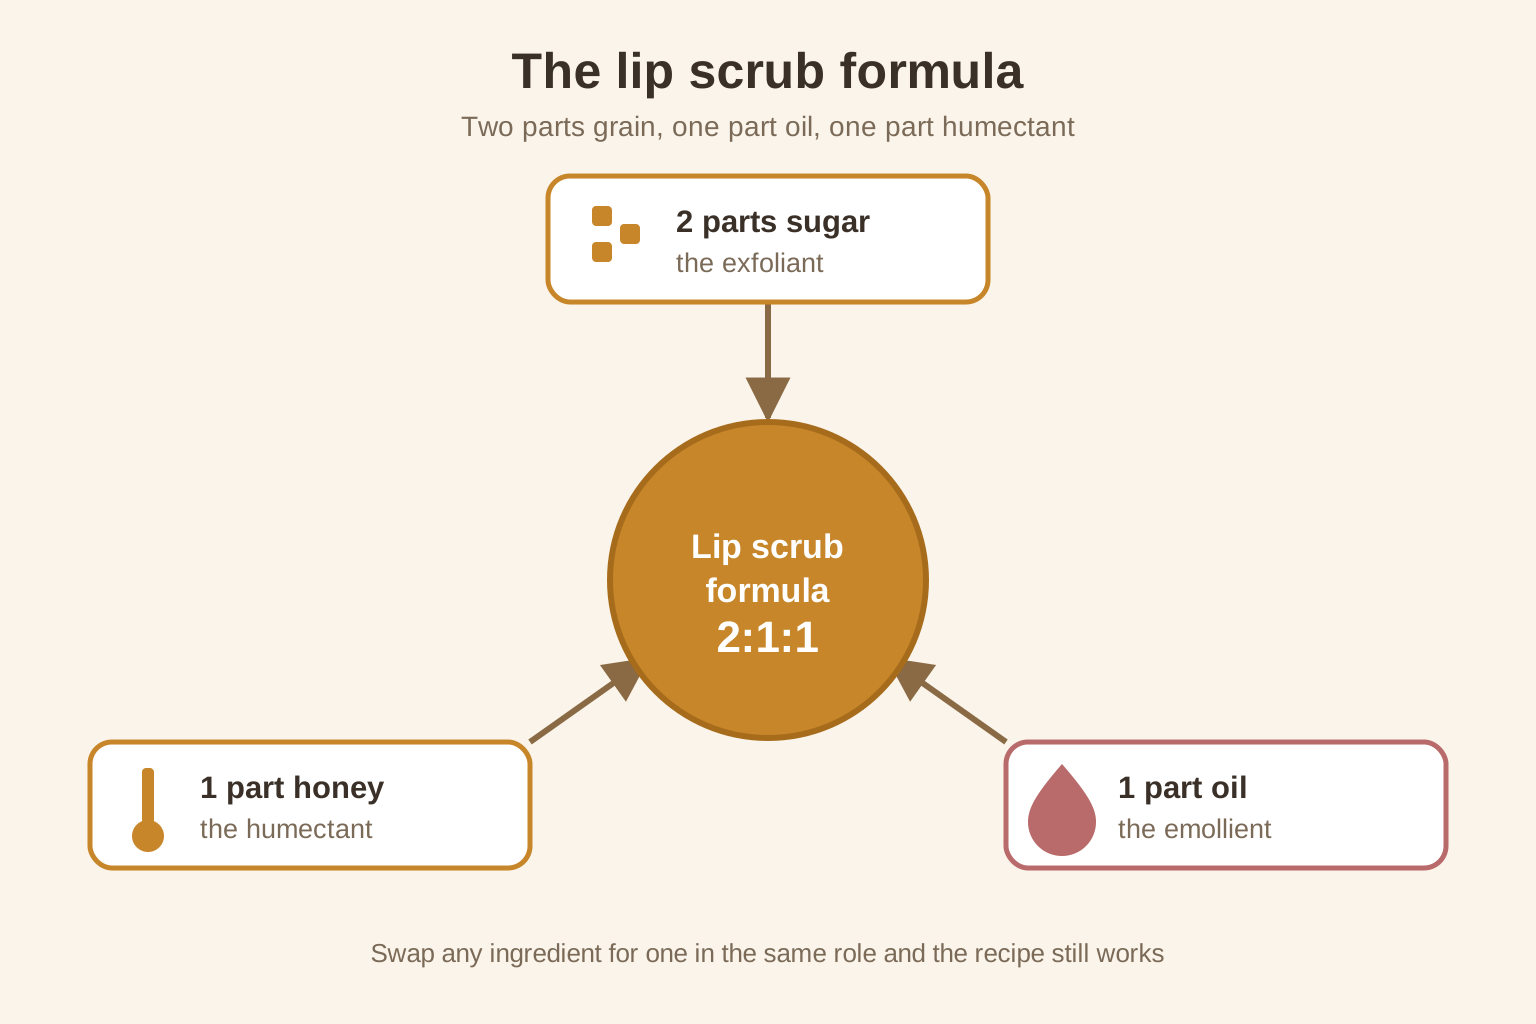
Every homemade lip scrub on the internet is the same three-part skeleton in different clothing: two parts abrasive, one part oil, one part humectant. Learn the ratio and you stop needing recipes — you start reading them as substitutions.
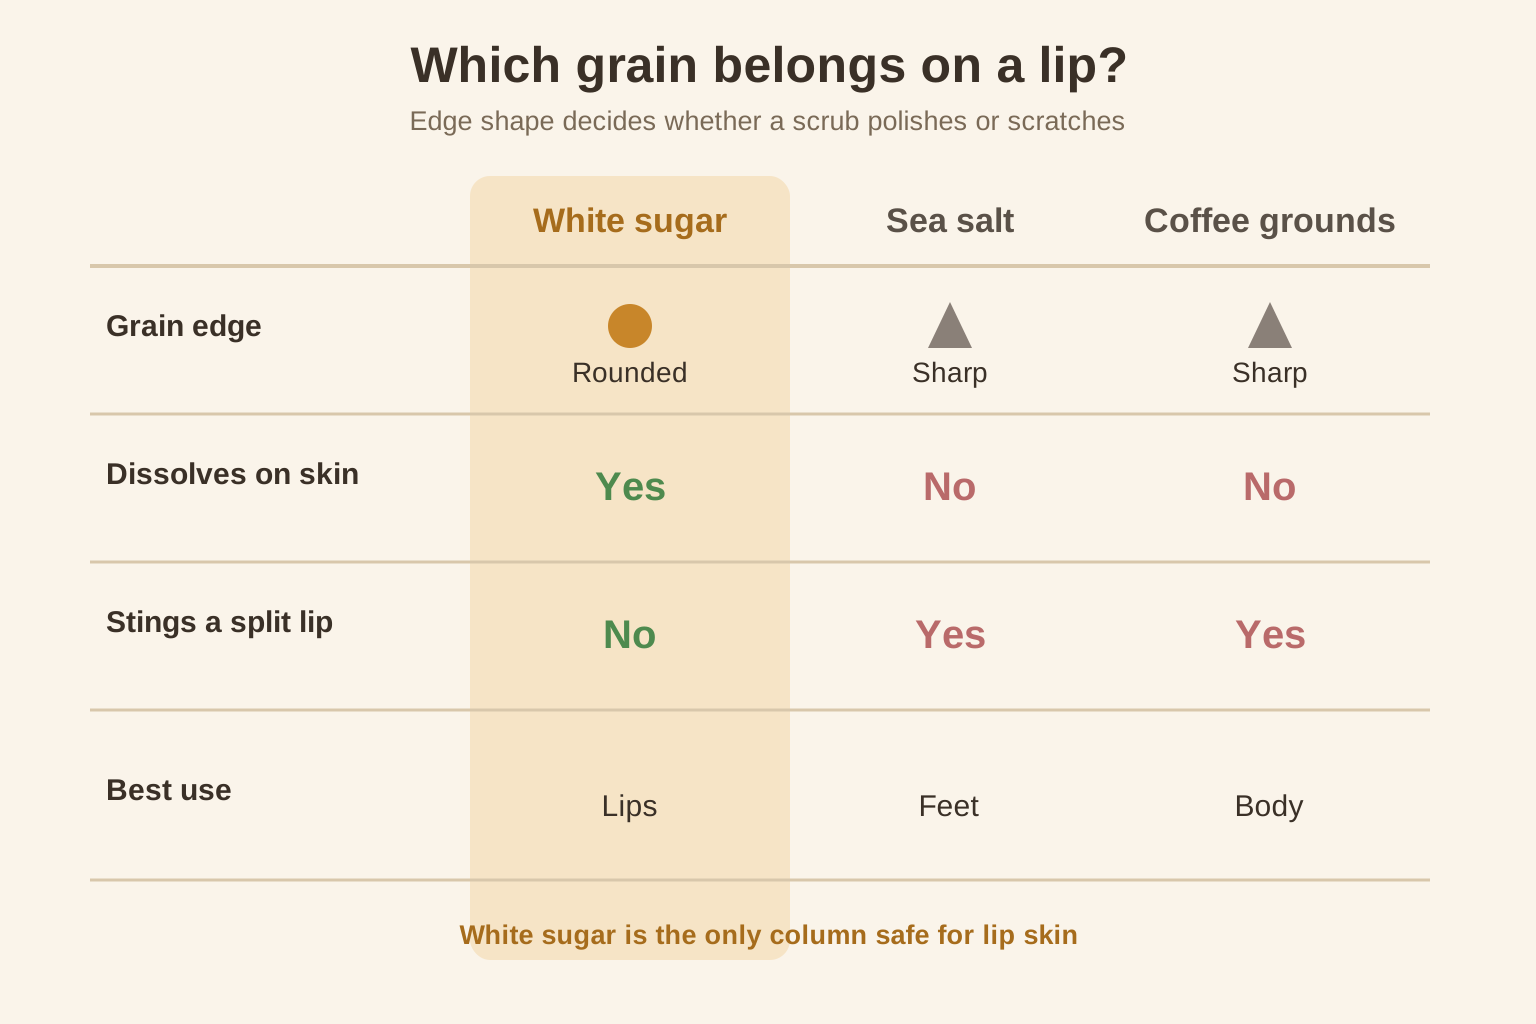
Sugar is the abrasive of choice for a physical reason, not a marketing one. Sucrose crystals are blocky rather than shard-shaped, they round off within seconds of contact with warm skin, and they dissolve as they work, so the abrasion tapers off instead of building. Sea salt and coffee grounds hold their edges for the whole massage, which is fine on a heel and wrong on a lip.
The oil is the emollient: it keeps the grains suspended and stops them dragging. The third part is the humectant, and honey is the standard choice because it binds water toward the surface while you work — this is what makes an exfoliating lip scrub homemade version feel cushioned rather than raw. The general case for why humectants pull water into skin applies to lips exactly as it does to hands or a body lotion.
One technique note decides whether the jar works. How to create a lip scrub that holds together: soften the oil to a paste, never melt it to a liquid. Liquid oil lets the sugar sink into a solid layer at the bottom within a day, and you end up scooping oil off the top for a week. The same logic drives texture in a best lotion for dry skin — suspension is a formulation problem, not a luck problem.
What you need before you follow any lip exfoliator recipe
The kit for how to make lip exfoliator scrub batches is four items: a measuring teaspoon, a small bowl, a shallow tin or jar with a screw lid, and a soft cloth for wiping. No blender, no double boiler.
Grain choice is the one decision that changes the result. Use white granulated sugar for lips that tolerate weekly exfoliation, and brown sugar when your lips flake but sting easily — its crystals are smaller and its molasses coating softens them further. Neither salt nor coffee belongs in a recipe for lip sugar scrub; both stay sharp long enough to open a split corner.
Oil choice affects shelf life more than feel. Jojoba and sweet almond oil resist rancidity for weeks longer than olive oil, and the case for what almond oil does for dry skin is well documented. Coconut oil is the exception: it is stable but sets hard below roughly 20 C.
Finally, how to make a lip exfoliator that does not grow anything: rinse the tin with boiling water and dry it completely before filling. Residual water, not the sugar, is what feeds mould. If you want the same reasoning applied to your face, start with choosing a gentle face exfoliator.
Everyday diy sugar lip scrub recipes for soft lips
Four base recipes, all built on the 2:1:1 ratio, all mixed in under two minutes. Every diy lip scrub recipe here makes roughly two teaspoons — six to eight uses — and that small batch size is deliberate, because a diy lip scrub carries no preservative and a big jar just spoils slowly.
Classic brown sugar and honey lip scrub
Two teaspoons brown sugar, one teaspoon softened coconut or jojoba oil, one teaspoon honey. Stir for thirty seconds until the mix clumps on the spoon rather than running off it. This is the answer to how to make an easy lip scrub with nothing bought specially, and it is the gentlest of the four because brown sugar crystals are the smallest. The cost: honey is hygroscopic, so in a humid bathroom the batch turns tacky and slides off the spoon within about ten days.
Coconut oil and white sugar lip polish
Two teaspoons white granulated sugar to one teaspoon coconut oil, with the honey dropped entirely. Without a humectant it sets firm, which makes it the one diy sugar lip scrub you can carry in a bag without it leaking through the lid. The tradeoff is real: white sugar is coarser, so cut the massage to twenty seconds, and below 20 C the tin goes solid and needs thirty seconds in a warm hand.
Vanilla brown sugar scrub for lips that hate mint
The classic base plus two drops of food-grade vanilla extract. It exists for one reason: a mint scrub gets licked off before it has done anything, and vanilla reads as sweet without the tingle that triggers licking. It is not for anyone who finds sweet scents nauseating first thing, and vanilla extract's alcohol content means you should skip it on already-cracked lips.
One-drop peppermint sugar lip scrub
This is how to make a sugar lip scrub with a tingle: the classic base plus exactly one drop of peppermint essential oil per two teaspoons. The tingle is a vasodilation response, so lips look fuller for around twenty minutes — that is the whole appeal. One drop is the ceiling, not a suggestion: peppermint oil is a known contact irritant on mucosal skin, and two drops in a batch this small is where readers report burning. Skip it entirely if you are prone to cold sores.
Targeted natural lip scrub recipes for specific lip problems
These three swap one component of the base formula to attack a named problem. Each one has a group that should not use it, listed with the recipe rather than buried at the end.
Strawberry and sugar scrub with fruit acid
Mash half a ripe strawberry into the classic base and use it within twenty-four hours. The fruit's malic and citric acid add a mild chemical component to the physical one, which helps with dullness that scrubbing alone will not shift. Because it is a natural exfoliating lip scrub with live acid in it, treat it as a two-week experiment used twice weekly, not a standing habit — and refrigerate the batch, because fresh fruit in oil spoils in days, not weeks.
Turmeric sugar scrub for pigmented lips
A pinch of turmeric — no more than an eighth of a teaspoon — stirred into the classic base. It is the diy exfoliating lip scrub people reach for when lips look darker than the surrounding skin. Two warnings nobody puts first: turmeric stains white towels, sinks and pale grout permanently, and the pigment change it offers is subtle and slow. Use an old cloth and give it a month before you judge it.
Oatmeal and shea butter scrub for sensitive lips
Swap half the sugar for finely ground oats and the oil for softened shea butter. This is the gentlest diy lip exfoliator here, built for lips that go red at everything, and the evidence behind colloidal oatmeal for irritated skin is why it is worth the extra grinding step. It exfoliates less per session, so expect to use it weekly rather than see instant results.
One caveat that spans all three: the honey lip exfoliator base suits every skin type except anyone with a pollen or bee-product allergy. And a natural lip scrub is not automatically a safe one — essential oils and citrus juice cause more lip reactions than any other DIY ingredient. The same "natural does not mean gentle" rule applies to face masks for glowing skin.

If you would rather not re-read this page every time you mix a batch, the ingredient cheat sheet below is a one-page card — role, ratio and caution for every ingredient named here — sized to tape inside a bathroom cabinet.
How to use a lip scrub at home without overdoing it
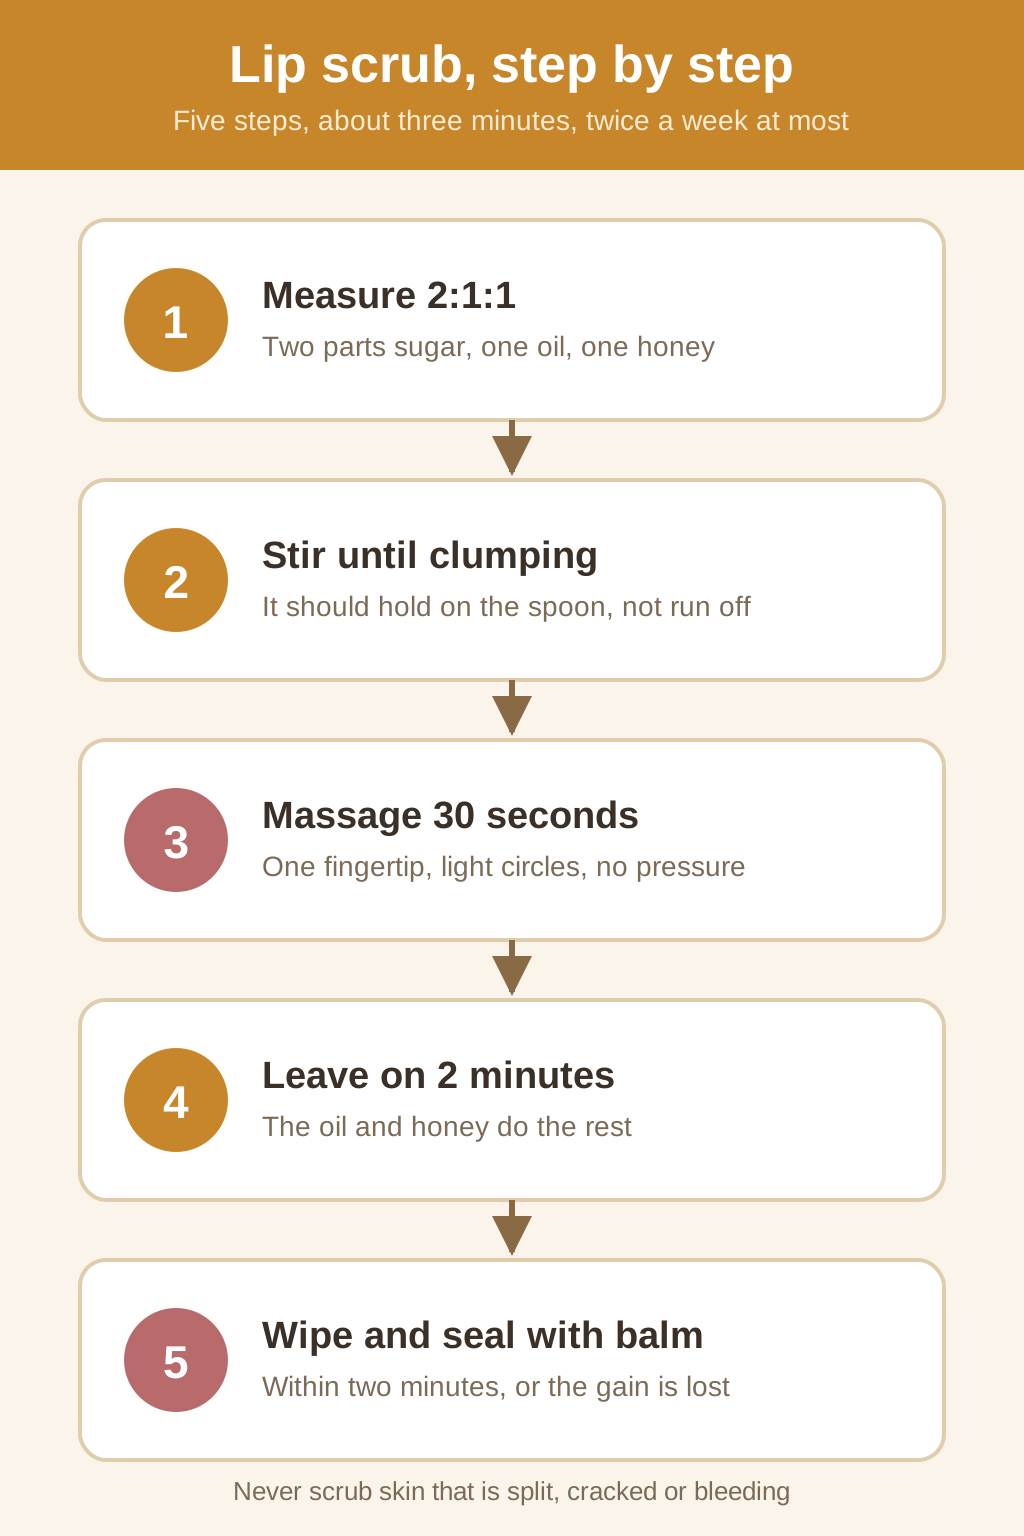
Thirty seconds of light circular pressure with one fingertip is the entire technique. Past thirty seconds you are no longer removing loose cells, you are abrading attached ones, and the flaking returns faster the following week.
Frequency follows condition, not habit: twice a week for lips that are merely dry, once a week for lips that flake, and never on skin that is broken, split or bleeding. Knowing how to make lip scrub at home is only half the job — the balm you apply in the two minutes after wiping decides how long the smoothness lasts, because freshly exfoliated lips lose water fastest exactly then.
The full sequence for how to make a sugar lip exfoliating scrub actually work: press a warm damp cloth to your lips for twenty seconds, massage the scrub for thirty, leave the residue on for two minutes, wipe with the cloth, then seal immediately. That last step is where most people quit, and it is the one that carries the result overnight. Slotting it into a fixed weekly place is easier if you already know how to build a skin care routine in the right order.
Stop for a week if you notice any of three signals: stinging under a balm you have used for months, a shiny tight feel instead of a soft one, or flaking that returns sooner after each scrub.
Some links below are affiliate links, and we may earn a commission if you buy through them at no extra cost to you.

Storing a handmade lip scrub so it stays safe to use
A handmade lip scrub made of honey, oil and sugar holds up for roughly four weeks at room temperature and about eight in the fridge. Neither number comes from a preservative — there isn't one — so both are estimates that shrink the moment the jar gets contaminated.
Scoop with a clean spatula or the back of a teaspoon, never a wet finger straight out of the shower. Water is the single fastest route to spoilage, and a fingertip carries both water and skin flora into a sugar-rich medium.
Discard a homemade lip exfoliator on any one of three signals: a sour or crayon-like rancid smell, a colour shift, or any visible fuzz on the surface. There is no salvaging the good half.
Batch size is therefore a safety decision. Anyone working out how to make homemade lip exfoliator should mix two tablespoons at a time and remake it, rather than filling a jar that will still be half full in month three. Vitamin E is often sold as the fix here; it slows oil rancidity and does nothing at all against microbial growth. For lips that stay chapped despite all of this, the broader options in evidence-based home remedies for chapped lips are worth reading, and daytime protection from SPF lip balm and real sun protection for lips addresses a cause rather than a symptom.
When a store-bought scrub beats a DIY jar
A good lip scrub off the shelf buys three things a kitchen batch cannot: a preservative system that survives a year, a milled grain size that is identical in every jar, and finishes — tint, SPF, flavour — that you cannot replicate with pantry ingredients.
Where the best lip scrub for dry lips genuinely beats DIY is consistency. If your lips flake year-round, a formula that behaves the same in February and July removes a variable; a honey batch that goes tacky in summer does not. The cost comparison is still lopsided — a DIY batch runs a few cents per use against several dollars for a retail jar that lasts months.
Buy rather than mix if you travel weekly, if you have a fragrance allergy and need a full ingredient list, or if your lips react unpredictably and you need to isolate one variable at a time. Mix if you scrub occasionally and already own sugar and oil. If texture is not your only lip complaint, lip plumpers that actually work covers a different problem entirely.
The picks below are affiliate links, and we may earn a commission if you buy through them at no extra cost to you.
Four questions narrow the shelf to three jars that match your lips, your fragrance tolerance and your budget.
Lip scrub questions people actually ask
Is a lip scrub for dry lips safe to use every day?
No. Twice a week is the practical ceiling for healthy lips. If the dryness comes from a retinoid, an antihistamine or a diuretic, exfoliating daily fights a drug side effect with friction and loses — drop to once a week and put the effort into sealing instead.
Does a lip peel diy with acids beat sugar?
Not at home. A lip peel diy mix using lemon juice or vinegar has no controlled pH, and lip skin has almost no barrier margin for error. Acid on lips is the one step worth leaving to a finished product with a tested formulation.
Can I use a toothbrush instead?
You can, and over months the bristle tips blur the vermillion border and leave a chapped ring around the lip line. A fingertip and sugar do the same job with a fraction of the mechanical damage. If your lips are split or bleeding, skip scrubbing altogether and use an unscented lip treatment until the skin closes.
Why do my lips look worse the day after?
Usually because the balm step was skipped, sometimes because thirty seconds became two minutes. Give any lip routine two weeks before you judge it — and remember lips burn faster than cheeks, so daily sunscreen SPF that actually protects keeps you from undoing the work.
One short email a week, and nothing else.
One lip and skin care tip a week. No product dumps.
Thanks — you're on the list.


